Email Deliverability Checklist: 19 Steps to Land in the Inbox
Getting your email into the inbox is not automatic. Email providers like Gmail and Outlook run every message through a scoring system that checks your sending infrastructure, your list quality, and your content before deciding where to route it. A single misconfiguration (a missing SPF record, a broken DKIM signature, or a DMARC policy that has never been set) is enough to send an entire campaign to spam.
This email deliverability checklist covers 19 steps organized into four phases: pre-setup (domain and infrastructure), pre-send (before every campaign), ongoing monitoring, and troubleshooting. It applies to both bulk email marketing and outreach email campaigns. Whether you are sending newsletters or running cold outreach, these steps give you the foundation to protect your sender reputation and consistently reach the inbox.
Why Email Deliverability Matters More Than Ever
Healthy email senders should hit a delivery rate of 97 to 99 percent. If you are below 95 percent, something in your setup is actively hurting you.
Beyond delivery rate, the metrics that matter most are:
- Bounce rate: Keep it below 2 to 3 percent. Hard bounces (invalid addresses) hurt your reputation the most.
- Spam complaint rate: Gmail flags senders above 0.1 percent. Above 0.3 percent, you risk having your domain blacklisted.
- Open rate: Useful for engagement signals, but Apple Mail Privacy Protection inflates open rates. Use clicks and replies as more reliable signals.
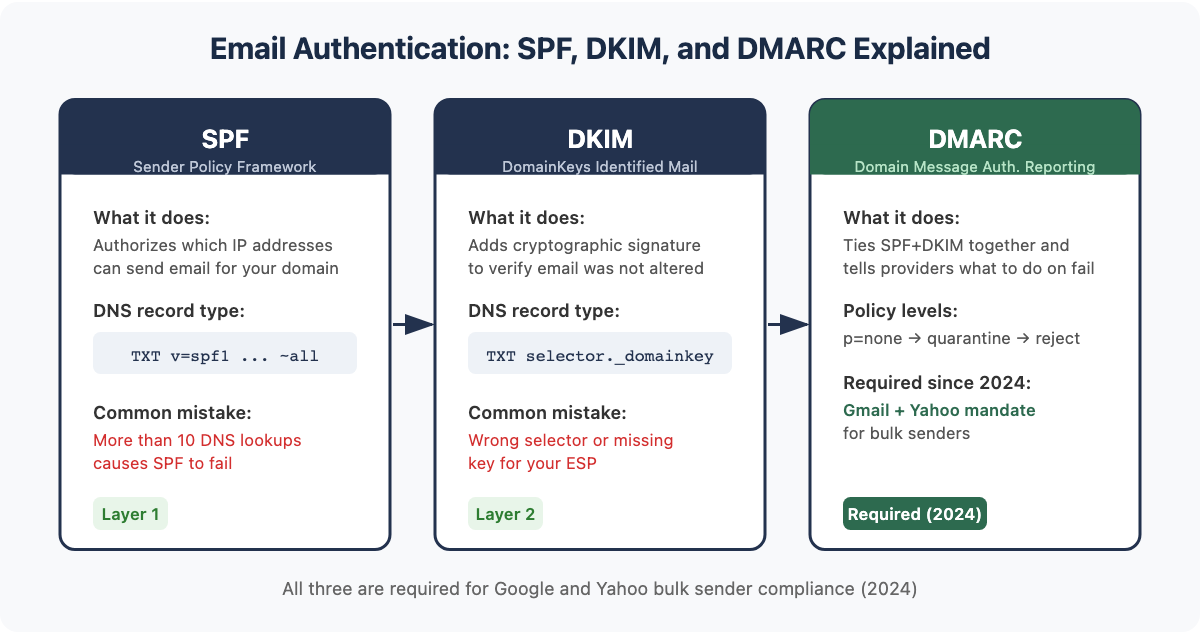
Starting in February 2024, Google and Yahoo introduced new bulk sender requirements that changed what is mandatory. Senders who send more than 5,000 emails per day to Gmail addresses must now have SPF, DKIM, and DMARC configured. One-click unsubscribe is also required. These requirements apply to marketing email and, in practice, have raised the bar for all outbound email.
Cold email senders face a stricter environment than newsletter senders. Bulk email to opted-in subscribers benefits from list consent and engagement history. Cold outreach goes to contacts who did not ask for your email, which means spam complaints are more likely if targeting and personalization are poor. For link building outreach and other cold email use cases, keeping volume per mailbox low (30 to 50 emails per day) and warming up new domains carefully is essential to protect your sender reputation.
Phase 1: Pre-Setup Checklist (Domain and Infrastructure)
Get these right before you send a single email. These settings affect every campaign you will ever run from this domain.
1. Choose a Dedicated Sending Domain or Subdomain
Never send campaigns from your root domain. If your root domain gets blacklisted, your entire business email goes down with it.
Use a dedicated subdomain for outreach (outreach.yourdomain.com) or a separate domain variant for cold email (yourdomain-mail.com). Keep your root domain reserved for internal communication and transactional email.
For new domains, age matters. ISPs treat new domains as suspicious. Give a new domain at least 30 days of existence before sending at any volume, and warm it up gradually during that period.
2. Configure SPF (Sender Policy Framework)
SPF tells receiving mail servers which IP addresses are authorized to send email on behalf of your domain. Without it, any server can claim to send from your domain.
Set up SPF by adding a TXT record to your domain’s DNS:
v=spf1 include:youresp.com ~allThe ~all (softfail) is safer than -all (hardfail) while you are testing. Once you are confident in your setup, switch to -all.
Common SPF mistakes: having more than 10 DNS lookups in your SPF record (this causes failures), and having multiple SPF records (only one is allowed).
3. Set Up DKIM (DomainKeys Identified Mail)
DKIM adds a cryptographic signature to your outgoing emails. The receiving server uses your public key (stored in DNS) to verify that the message has not been altered in transit.
Your email service provider will generate your DKIM keys. The setup involves adding a TXT record to your DNS:
selector._domainkey.yourdomain.com -> v=DKIM1; k=rsa; p=your-public-keyEach ESP uses a different selector. Follow your provider’s setup guide specifically. DKIM is not optional: it is one of the signals Gmail uses to judge sender reputation.
4. Implement DMARC
DMARC ties SPF and DKIM together and tells email providers what to do when a message fails those checks. It also gives you a reporting address to receive aggregate data on who is sending email using your domain.
DMARC policy levels:
- p=none: Monitor only. Failing messages are still delivered. Use to test.
- p=quarantine: Failing messages go to spam.
- p=reject: Failing messages are blocked entirely.
Start with p=none and a reporting address:
v=DMARC1; p=none; rua=mailto:dmarc@yourdomain.comReview the aggregate reports for 30 to 60 days before moving to p=quarantine. Work toward p=reject once you have confirmed all legitimate sending sources are passing.
DMARC is now required by Gmail and Yahoo for bulk senders. Even if you are not a bulk sender, having DMARC at p=none with reporting is the minimum baseline.
5. Choose Your IP Strategy
Your IP address has its own reputation. If you share an IP with a bad sender, you inherit some of their reputation problems.
Dedicated IP: Best for high-volume senders (100k+ emails per month). You have full control over reputation, but you need to warm up the IP from scratch, and its reputation is unproven until established.
Shared IP: Best for lower-volume senders. No warmup required and faster setup. The downside is that your reputation is partially affected by the other senders in the shared pool. The pool quality depends on your ESP.
For cold outreach at low volume (under 5,000 emails per month per domain), shared IPs at reputable ESPs are fine. For high-volume marketing email, a dedicated IP gives you full ownership of your reputation.
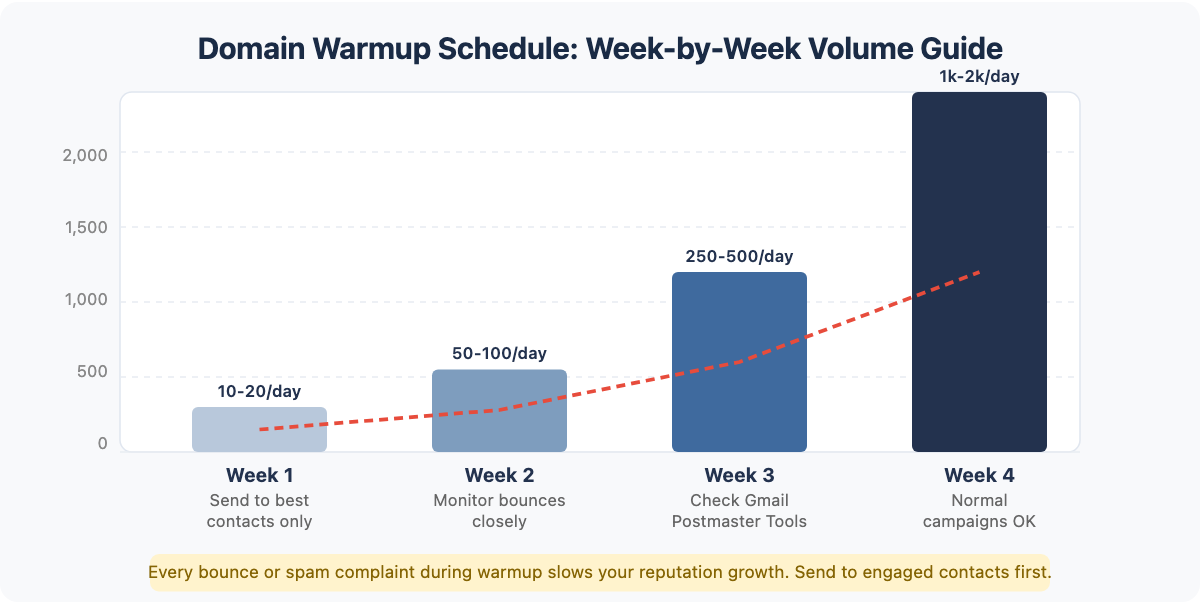
6. Warm Up Your Domain and IP
Warmup means gradually increasing your sending volume over several weeks. ISPs learn to trust senders who behave predictably, not senders who appear from nowhere and send 10,000 emails on day one.
A basic warmup schedule for a new domain:
- Week 1: 10 to 20 emails per day
- Week 2: 50 to 100 emails per day
- Week 3: 250 to 500 emails per day
- Week 4: 1,000 to 2,000 emails per day
During warmup, send only to your most engaged, cleanest contacts. Every bounce or complaint during warmup sets back your reputation significantly.
Tools that automate warmup for cold email: Mailreach, Lemlist Warm Up, Instantly, Smartlead. These tools send emails between seed mailboxes and automatically mark them as not spam, building positive engagement signals. Many outreach email tools include warmup as a built-in feature.check whether your sending platform offers it before paying for a separate service.
Phase 2: Pre-Send Checklist (Before Every Campaign)
Run through these steps before every campaign you send. They catch problems that could cost you inbox placement or sender reputation.
7. Clean and Verify Your Email List
Your list degrades over time. People change jobs, abandon email addresses, and mark emails as spam. Sending to invalid addresses triggers hard bounces. Sending to spam traps (old addresses ISPs reuse to catch bad senders) can get you blacklisted immediately.
Before every campaign:
- Remove hard bounces from every previous campaign
- Run the list through an email verification tool: NeverBounce, ZeroBounce, or Hunter Verify are the most commonly used
- Remove role-based addresses (info@, support@, admin@), which are rarely monitored and often trigger complaints
- Remove contacts who have not engaged in the last 90 to 180 days, unless you are running a re-engagement campaign specifically
A clean list should have an invalid rate below 2 percent when you verify it.
8. Segment Your List
Sending the same email to everyone on your list is a deliverability risk. ISPs look at engagement signals: if a large portion of recipients never open your emails, it signals that your content is not relevant to them.
Segment at minimum by:
- Engagement level: Recent openers and clickers vs. inactive subscribers
- Industry or company size: Especially relevant for B2B cold outreach
- Stage in the funnel: Leads who have shown interest vs. cold contacts
Never send to your full list all at once. Spread large campaigns across multiple days.
9. Run a Spam Filter Test
Before you send, test your email against the spam filters that Gmail, Outlook, and other providers use. These email deliverability tools reveal authentication failures, blacklist issues, content triggers, and formatting problems before you hit send.
Free and paid options:
- Mail-Tester (mail-tester.com): Free. Send a test email to a generated address, get a score out of 10 with specific failure reasons.
- GlockApps: Paid. Checks spam filter scores across multiple providers simultaneously.
- MailGenius: Free tool for checking email against spam triggers.
A score of 9 out of 10 or higher on Mail-Tester is a reasonable target. Any authentication failure (SPF, DKIM, DMARC errors) should be fixed before sending.
10. Test Inbox Placement Across Providers
Spam filter tests show whether your email passes filters. Inbox placement tests show where your email actually lands (inbox, spam, or promotions tab) across different email providers.
Gmail, Outlook, and Apple Mail all use different filtering logic. An email that passes Gmail’s filters might land in Outlook’s junk folder.
Tools for inbox placement testing:
- GlockApps: Tests across 50+ seed mailboxes covering major providers
- Litmus: Also shows rendering across clients
- Email on Acid: Good for combined rendering and placement testing
Run this test for any campaign going to over 1,000 recipients. For cold outreach, test whenever you change your email template.
11. Check Your From Name and Reply-To Address
Spam filters and human recipients both judge your sender identity. From names like “no-reply@” or generic company names without a person signal low-quality sender behavior.
Best practices:
- Use a real person’s name or “Name at Company” format
- Set a functional Reply-To address that someone monitors
- Keep your From name consistent across campaigns; changing it frequently can hurt recognition and reputation
- Avoid using special characters or excessive capitalization in From names
12. Include a Plain-Text Version
All bulk email should include a plain-text version alongside the HTML version. Spam filters penalize emails that are HTML-only because it suggests a bot-generated message rather than a human communication.
Most ESPs generate a plain-text version automatically, but auto-generated versions often strip formatting in ways that produce garbled text. Check the plain-text version manually to make sure it reads clearly. The plain-text should contain the same core message as the HTML, in logical reading order.
For cold email, plain-text-only emails often outperform HTML in deliverability and reply rates because they look more like a real human email.
13. Verify Your Unsubscribe Link Works
One-click unsubscribe is now a requirement for bulk senders under Google and Yahoo’s 2024 guidelines. The unsubscribe process must complete within two business days.
Before sending:
- Click the unsubscribe link in your test email and confirm it works
- Confirm the contact is removed from your sending list within 48 hours
- Check that your suppression list is synced across all sending platforms you use
For cold email outreach tools, most add unsubscribe language to the email footer automatically. Make sure it is enabled in your settings.
14. Avoid Spam Trigger Words and Patterns
Content plays a smaller role in spam filtering than it did 10 years ago, but it still matters. Certain patterns reliably trigger filters or lower engagement.
Words to avoid in subject lines: free, guaranteed, act now, you’ve been selected, winner, no cost, plus excessive exclamation points.
Formatting patterns to avoid:
- Excessive images with little text (image-to-text ratio too high)
- All-caps subject lines or body text
- Red or bright-colored text
- Multiple different fonts or font sizes
- Links that do not match the display text (link text says one thing, URL is different)
- Attachments in cold email campaigns (treated as suspicious by most filters)
Run a spam word check as part of your pre-send process. Mail-Tester flags most of these automatically.
Phase 3: Ongoing Monitoring Checklist
Deliverability is not a one-time setup. Reputation changes as your sending behavior changes. Check these metrics and tools on a regular schedule.
15. Monitor Delivery Rate and Bounce Rate
Your ESP’s campaign reports show delivery rate (emails successfully accepted by receiving servers) and bounce rate (emails that failed delivery). Review these after every campaign.
Action thresholds:
- Delivery rate drops below 95%: investigate immediately
- Hard bounce rate above 2%: pause the campaign, clean the list
- Soft bounce rate above 5%: usually a temporary server issue, but watch for patterns
Hard bounces must be removed from your list immediately and permanently. Continuing to send to hard-bounced addresses is one of the fastest ways to damage sender reputation.
16. Track Spam Complaint Rate
Spam complaint rate is the percentage of recipients who click “Mark as Spam” on your email. It is one of the most damaging signals you can generate.
Set up complaint tracking through:
- Gmail Postmaster Tools (postmaster.google.com): Free. Shows domain reputation (High/Medium/Low/Bad), spam rate, and authentication pass rates for email sent to Gmail. Required setup: verify your domain.
- Yahoo Complaint Feedback Loop: Free. Sends you complaint reports for emails flagged as spam by Yahoo users.
Check Gmail Postmaster Tools at least weekly. If your domain reputation drops to Medium, investigate immediately. Low or Bad means you have a serious deliverability crisis.
Keep spam complaint rate below 0.1 percent. Google’s threshold for taking action starts at 0.1 percent and gets aggressive above 0.3 percent.
17. Monitor Your Domain and IP Reputation
Reputation is tracked at both the domain level and the IP level. Both matter.
Tools:
- Gmail Postmaster Tools: Domain reputation for Gmail traffic
- SenderScore (senderscore.org): Score from 0 to 100 for your IP reputation
- Talos Intelligence (talosintelligence.com): Cisco’s IP and domain reputation check
- MXToolbox (mxtoolbox.com): Checks authentication records and blacklists
Check these monthly at minimum. If you increase sending volume significantly, check weekly until the new volume is established.
18. Check Blacklists Regularly
Getting listed on a major blacklist will block your email from large portions of the internet. Most ESPs monitor blacklists and will alert you, but do not rely on that alone.
The most important blacklists to monitor:
- Spamhaus (the most widely used)
- Barracuda
- SORBS
- Spamcop
Check your sending IP and domain at MXToolbox’s Blacklist Check. If you are listed:
- Stop sending immediately until you understand the cause
- Fix the underlying problem (usually high complaint rates, spam trap hits, or a compromised account)
- Submit a delisting request to the specific blacklist
- Expect 24 to 72 hours for removal
Do not submit a delisting request before fixing the underlying cause; getting listed again quickly after removal makes future delistings harder.
19. Maintain List Hygiene Continuously
List hygiene is not a one-time exercise. Contacts go stale, engagement drops, and addresses become spam traps over time.
Ongoing hygiene practices:
- Re-engagement campaigns: Before removing inactive contacts, try a re-engagement email. A subject like “Are you still interested?” to contacts who have not opened in 6 months can revive a portion of them.
- Sunset policy: Remove contacts who have not engaged after two re-engagement attempts. There is no rule that says you must keep them, and keeping unengaged contacts hurts everyone on your list.
- Bounce suppression: Ensure hard bounces are immediately added to a global suppression list shared across all your sending platforms.
- Complaint suppression: Every complaint should remove that contact from all future sends automatically.
Phase 4: Troubleshooting Checklist (When Deliverability Drops)
When something goes wrong, work through each scenario systematically before making changes.
Bounce Rate Spikes
Likely causes: a list segment with old or unverified addresses, a data import from a low-quality source, or scraping-sourced contacts.
Steps:
- Identify which list segment generated the bounces
- Verify the segment through an email verification tool before resending
- Remove all hard bounces immediately
- Check if the bouncing addresses share a pattern (same domain, same import source)
Emails Landing in Spam
Work through this in order:
- Authentication check: Verify SPF, DKIM, and DMARC are all passing. Use Mail-Tester or MXToolbox.
- Blacklist check: Check your sending IP and domain against Spamhaus and Barracuda.
- Content check: Run the email through a spam filter test. Look for trigger words, broken links, or problematic formatting.
- Reputation check: Check Gmail Postmaster Tools for domain reputation. If it shows Low or Bad, you need a sustained period of good sending behavior before it recovers.
- Volume check: Did you send a large volume spike recently? Sudden volume increases without warmup trigger spam filters.
Open Rate Drops Suddenly
First, rule out a measurement artifact. Apple Mail Privacy Protection auto-opens emails to load tracking pixels, inflating open rates. A drop in measured open rate may reflect iOS users turning off MPP, not an actual deliverability problem.
If clicks and replies have also dropped, you have a real deliverability issue. Follow the “emails landing in spam” steps above.
If only opens dropped but clicks and replies are stable, it is likely a measurement issue, not a deliverability issue.
Blacklisted Domain or IP
If you are on a major blacklist:
- Stop sending from the listed IP or domain immediately
- Identify the cause through Gmail Postmaster Tools and your campaign complaint reports
- Fix the underlying issue (most often: high complaints, spam trap hits, or compromised sending account)
- Submit a delisting request through the blacklist’s web form
- Wait 24 to 72 hours for processing
If a domain is severely compromised, it is sometimes faster to start with a fresh domain (warmed up properly) than to attempt recovery. For IP blacklisting with a dedicated IP, contact your ESP; they may be able to assign you a new IP while you work through recovery.
Quick-Reference Email Deliverability Checklist
| Phase | Item | Tool | Priority |
|---|---|---|---|
| Pre-Setup | Configure SPF | DNS editor | Critical |
| Pre-Setup | Configure DKIM | DNS editor / ESP guide | Critical |
| Pre-Setup | Implement DMARC | DNS editor | Critical |
| Pre-Setup | Set up dedicated sending subdomain | Domain registrar | High |
| Pre-Setup | Choose IP strategy | ESP settings | High |
| Pre-Setup | Warm up domain and IP | Mailreach / Instantly | High |
| Pre-Send | Verify and clean email list | NeverBounce / ZeroBounce | Critical |
| Pre-Send | Segment list by engagement | ESP segmentation | High |
| Pre-Send | Run spam filter test | Mail-Tester / GlockApps | High |
| Pre-Send | Test inbox placement | GlockApps / Litmus | Medium |
| Pre-Send | Check From name and Reply-To | ESP settings | Medium |
| Pre-Send | Add plain-text version | ESP settings | Medium |
| Pre-Send | Verify unsubscribe link | Manual test | Critical |
| Pre-Send | Check for spam trigger words | Mail-Tester | Medium |
| Monitoring | Track delivery rate and bounce rate | ESP dashboard | Critical |
| Monitoring | Monitor spam complaint rate | Gmail Postmaster Tools | Critical |
| Monitoring | Check domain and IP reputation | Postmaster Tools / SenderScore | High |
| Monitoring | Check blacklists | MXToolbox | High |
| Monitoring | Maintain list hygiene | NeverBounce + ESP suppression | High |
Frequently Asked Questions
What is a good email deliverability rate?
A good email deliverability rate is 97 to 99 percent. This means 97 to 99 percent of the emails you send are accepted by the receiving mail server (not bounced). Note that deliverability rate is different from inbox placement rate: email can be delivered and still land in spam. Most ESPs report delivery rate in campaign analytics; inbox placement requires a separate testing tool like GlockApps.
How do I check my email deliverability for free?
Several free tools let you check email deliverability. Mail-Tester (mail-tester.com) gives you a deliverability score by sending a test email to a generated address.it is the most widely used free option for this purpose. Gmail Postmaster Tools is free and shows your domain reputation and spam rate for emails sent to Gmail addresses. MXToolbox checks your authentication records and blacklist status for free. For inbox placement testing across multiple providers, GlockApps offers limited free credits.
Does email deliverability affect cold email?
Yes, and cold email is often more affected by deliverability issues than bulk marketing email. Cold email goes to recipients who did not opt in, which means spam complaints are more likely if targeting is poor. Cold email senders should keep daily sending volume per mailbox low (30 to 50 emails per day is a common safe range), warm up new domains carefully over several weeks, and use personalization to keep complaint rates low. All the same authentication requirements (SPF, DKIM, DMARC) apply.
How often should I clean my email list?
Clean your list before every major campaign send. At minimum, run a verification sweep quarterly on any list that has not been fully active. If you are importing contacts from a new source (a tradeshow scan, a purchased list, a scraping tool), verify the list before sending even a single email. Hard bounces should be removed immediately after every campaign; most ESPs handle this automatically. Inactive contacts (no opens or clicks in 90 to 180 days) should be moved to a re-engagement campaign and removed if they do not re-engage.
What is the difference between email delivery and email deliverability?
Email delivery means the email was accepted by the receiving mail server and did not hard bounce. Email deliverability means the email reached the inbox (as opposed to the spam folder or promotions tab). You can have a 99 percent delivery rate and still have poor deliverability if a large portion of your delivered emails land in spam. Delivery is a binary pass/fail; deliverability describes where in the mailbox the email ends up. The two terms are often used interchangeably but they measure different things.